Get the latest updates from us for free

Sign-up for FREE weekly Newsletter.

Remove Vocals From Music to Create Your Own Karaoke: Audacity vs Vocal Reducer

Be the first to comment!
Labels: ,

Removing vocals from songs is generally a simple process, but results can vary widely depending on the instruments used and whether or not the voice is center-panned. Usually vocals are placed in the “center” of the stereo, meaning, they are equally distributed in both the left and right channels. The vocal on the left channel is the exact replica of the vocal on the right channel. Instruments, however, are distributed unevenly. When that happens, it’s simply a matter of subtracting one channel from the other, and the vocal is almost completely removed.

Vocal Reducer is a free software that anybody can use to quickly remove vocals from songs. But before we see how Vocal Reducer works, we will try to do the same using Audacity and then find out how the results compare.

Remove Voice Using Audacity

  1. Import your stereo file into Audacity.
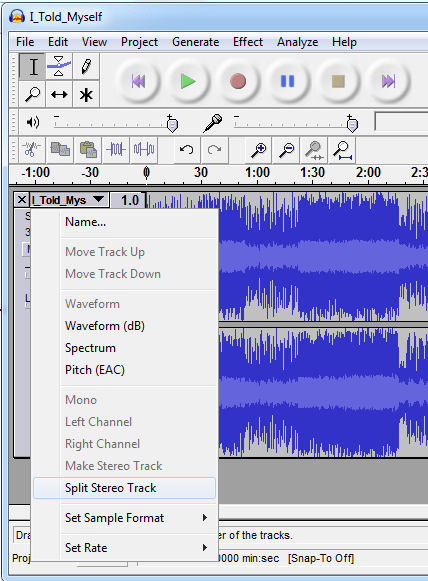
  2. Open the track menu (click the arrow next to the track title), and choose “Split Stereo Track.”

    audacity-1

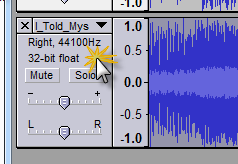
  3. Select the lower track (the right channel) by clicking it in the area around the mute/solo buttons.

    audacity-2

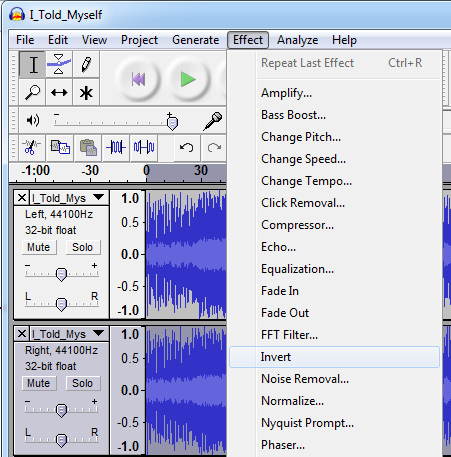
  4. Choose “Invert” from the Effects menu.

    audacity-4

  5. Using the track menus, change each track to “Mono.”
    audacity-3

Press the Play button. If the music file is just right, the voice will be gone but most of the other instruments will be unaffected, just like a karaoke track. You can now use the Export command in the File menu to save the results.

Remove Vocals Using Vocal Reducer

An undesirable side effect of voice removal using Audacity is that bass is removed from the song along with the vocals because like vocals, bass is often mixed in dead center. With the bass portion removed, bass guitars, kick drums and similar low frequency instruments are also removed. This can be avoided by using a low-pass filter that allowa very low frequencies to “pass through”. In other words, low frequencies below a certain threshold will not be removed when the stereo channels are subtracted from each other. This function is provided in Vocal Reducer. As a result, Vocal Reducer retains the bass and hence karaoke music generated using this program sounds much better than those produced by Audacity.

The program is straightforward to use: load the stereo MP3 file into Vocal Reducer and then click on the Vocal Reducer button.
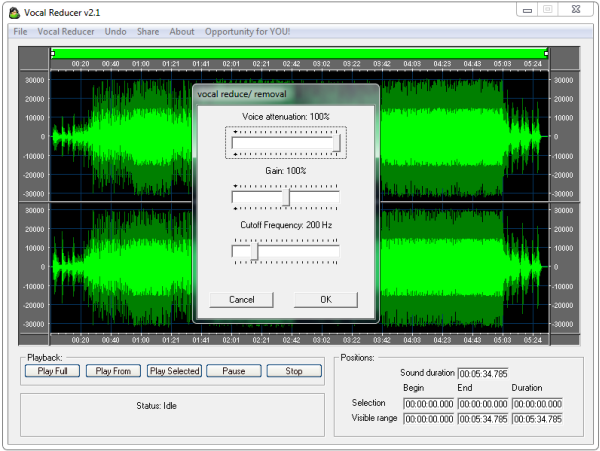
vocal-reducer

The default settings are perfect – voice attenuation at 100%, gain at 100% and the threshold of the low-pass filter set at 200 Hz. Click OK to process the music file. When it’s done, your Karaoke will be ready.

Vocal Removal: Comparison between Audacity and Vocal Reducer

Notice the lack in bass and general loss in quality when the music is processed with Audacity. The output of Vocal Reducer is significantly better.

Sources: Audacity help, Renegade Minds

How to Secure or Password Protect your Firefox

Be the first to comment!
Labels: ,

How to Password Protect Firefox

Firefox has an option to set a Master password to protect sensitive information in your Firefox profile. However, this is limited to only protecting unauthorized users from viewing your saved passwords on websites. The master password doesn’t prevent users from launching Firefox or opening pages or accessing your bookmarks. It also doesn’t prevent users from accessing sites the browser is already logged in to. If you are looking to protect your entire Firefox profile or the browser itself and not just your passwords, we have two add-ons for the purpose.

Before you can use these add-ons, you have to setup a master password. For this, click on the Tools menu and then click on Options. In the Options window, click on the Security icon. Check the box “Use a master password” and then define your password.

firefox-master-pwd

StartupMaster

StartupMaster is a simple add-on for Firefox that asks for the master password at launch. Every time you start Firefox, you will get a password prompt as shown below, before the main window is displayed. If there is no master password set, the extension does nothing.

firefox-startupmaster

StartupMaster also fixes the annoying multiple password prompt issue. Once you are logged in with the master password, Firefox won’t bother you with password prompts when you attempt to view your saved passwords.

Master Password+

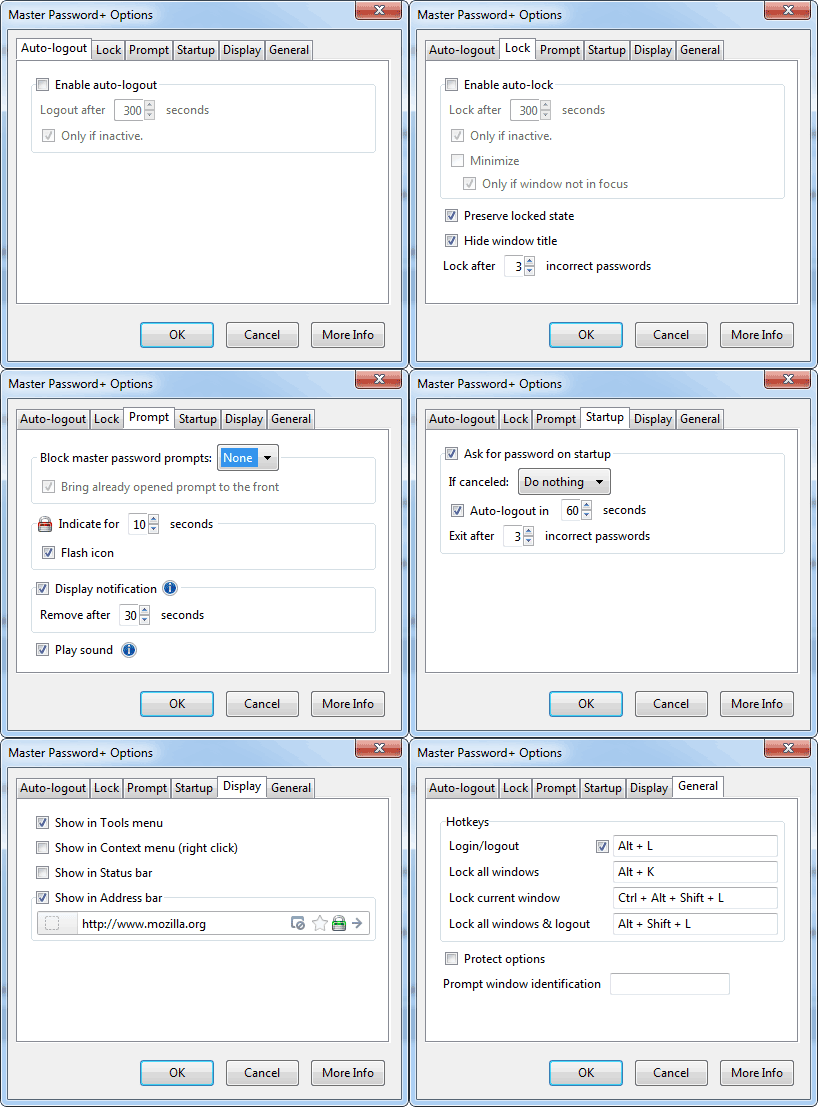
Master Password+ greatly enhances the security feature of the master password by allowing owners to completely lockdown the browser, set browsing time limits, boot out inactive users, and more.
What Master Password+ can do:
  • Ask for master password on Firefox startup
  • Exit Firefox when a number of wrong password attempts are made
  • Automatically lock browser when user is inactive for a certain period of time
  • Automatically lock browser after a certain time has elapsed even if the user is active. This is useful to enforce browsing time limits on the user
  • Block multiple password prompts when the user is already logged in
  • Use keyboard hotkeys to lock the browser, lock the active window or lock all windows
firefox-master-pwd-plus

SmartPower: Flexible Rules to Schedule Shutdown or Hibernate PC

Be the first to comment!
Labels:

SmartPower: Flexible Rules to Schedule Shutdown or Hibernate PC

Windows has several built in power plans or schemes intended to maximize the computer’s performance or conserve power or both at the same time. A typical power plan monitors the power usage by the computer’s different hardware and automatically turns them on or off depending on whether they are being actively used or lying idle. Windows will also automatically change these settings if the laptop is running off battery power. The default plans meet most people's computing needs but if you have special requirements, you will find Windows’ power plans inadequate.

These special requirements can be fulfilled by third party software such as SmartPower. The program can automatically hibernate or suspend or shutdown your PC, or prevent this from happening based on rules defined by the user. The rules include:
smartpower
  • Schedules: The program can wake up the computer or put it to sleep on schedule. The user can set the wake-up time and sleep time for each day of the week separately.
  • Users: If there is user activity on the computer SmartPower will prevent the computer from shutting down or hibernate.
  • Devices: If one or more devices such as the network card is online the computer will not turn off.
  • Network traffic: The computer will stay on if one or more network interfaces is receiving or sending data above a certain configurable threshold.
  • CPU usage: if the CPU is above a configurable threshold, the computer will stay awake.
  • Processes: The computer will stay on if certain programs or processes are running.
  • Power requests: If one or more programs have requested "display power", "system power" or "away mode", the computer stays awake.
These rules can be combined to create complex power profiles. For example, you may have your computer scheduled to wakeup everyday of the week from 9AM until midnight. But sometimes you work beyond midnight. When SmartPower detects that you are logged in, it won’t put the computer to sleep at 12AM. Similarly, if you have network traffic monitoring enabled and the threshold set to 15KB/sec, the computer won’t hibernate or sleep if it’s busy downloading something even if it’s past midnight. But once the download stops and the network traffic falls below 15KB/sec it will honor the schedule and put the computer sleep.
SmartPower works on Windows XP and later.

Syncsi for Outlook: Carry Microsoft Outlook Mails on a Portable USB Drive

Be the first to comment!
Labels:

Syncsi for Outlook: Carry Microsoft Outlook Mails on a Portable USB Drive

If you use Microsoft Outlook as your primary email program, you know there is no way of installing it on a USB drive and making it portable. However, you can synchronize your Outlook profile data to a folder on a USB Flash drive and access them from the USB drive on any computer. This is possible through a software called Syncsi for Outlook.

Syncsi a great away to carry your Outlook emails and data along with you. It allows you to save your Outlook folders to your USB flash drive, then plug this flash drive to another computer and restore those folders to Outlook. Even if the second computer doesn’t have Outlook installed, you can still view your data from within the program.
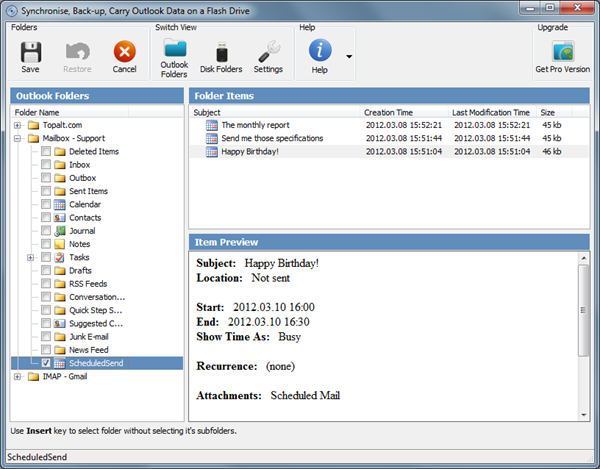
Syncsi is designed to be used as a portable application, and therefore, it should be installed to a portable storage device, such as USB flash drive, SSD card, external hard drive etc.. When you open Syncsi on a computer with Outlook installed, it will automatically detect your Outlook folders and present them on the program’s window. Here you can select the folder you wish to synchronize or backup to the USB drive.
Syncsi1
Herein lies a little problem. The freeware version can backup only one folder; it’s either the inbox, or the outbox or your contacts or your tasks and so on. The Pro version has no such limitation but will set you back by about $20.
After you have made the folder selection, click on the "Save" button and the content of the folder will be zipped and saved to your flash drive.
To restore a folder to Outlook, click on the “Disk Folders" button on the toolbar, choose the Outlook folder you want to restore and click the "Restore" button.
For your peace of mind, you can password protect this folder so that nobody can read your mails.
Syncsi works with all types of Outlook folders (calendar, contact, email, journal, note and task) and supports all Outlook versions: 2000, 2002 (XP), 2003, 2007 and 2010 (32 and 64 bit).

PictuTools: Add Several Online Image Editing Tools to Context Menu [Firefox]

Be the first to comment!
Labels: ,

PictuTools: Add Several Online Image Editing Tools to Context Menu [Firefox]

There are lot of online resources that lets you change, resize, crop and enhance images without having to learn to use heavy weights like Adobe Photoshop. Judging by the sheer number of such tools available, and the interest in acquiring them by the likes of Google it can be assumed that they are immensely popular. If you happen to use them often and have these sites tucked away in your bookmarks, and if you also use Firefox, you’ll find PictuTools pretty useful.

This add-on implements a context-menu which gives you quick access to several online services providing image manipulation tools such as Pixlr, BeFunky, SumoEditing, LunaPic and some more. You can convert images to a number of different formats including EPS, GIF, ICO, TIFF, PDF, TGA and WebP, perform reverse image search, view EXIF data, identify fonts and generate QRCodes among a few. It also offers a couple of image hosting sites to upload images for re-sharing, and an option to share images on Facebook and Twitter.
pictutools
When you want to edit an image you found online, simply right click on the image and choose the service which you want to use. This will take you to the service provider’s website with the image automatically uploaded and ready to work upon. At the moment the add-on only works on web images and not on local files on your hard disk.
The full list of supported services are given below.
Edit
  • BeFunky: BeFunky lets you apply photo effects, enhance, edit pictures and photos online. Cartoon, sketch, painting, pop art and more...
  • DrPic: Crop, Resize, Add Text, Special Effects, and Host your pictures online for free (with ads, in HTML/JS)
  • FotoFlexer: FotoFlexer lets you remove blemishes, change skin/hair color, morph photos and more! 100% free (with ads)
  • Iaza: Provides several conversion and effect tools by just clicking links
  • LunaPic: Edit Your Pictures with this basic but powerful online editor (ads, HTML)
  • Phixr: Online photo editor with no Flash required
  • Pixenate: Edit photos online, fast and easily - No plugins required.
  • PixLR: Flash-based online image editor.
  • PixLR (express): Flash-based online image editor, express/basic version
  • PixLR (o-matic): Flash-based online image editor which lets you apply different effects easily
  • SumoPainting: With SumoPaint you can Create, Share and Remix your Images.
  • Zygomatic: HTML-based editor. Resize, filters, sepia, crop, rotate, flip, effects
  • DeMotivational Poster: Meme Generator
  • pomf.me: Captioning tool
  • Ancient Look: Makes the image look like very old photographs
  • DynamicDrive Optimizer: Lets you easily optimize your gifs, animated gifs, jpgs, and pngs, so they load as fast as possible on your site.
  • SmushIt Optimizer: Smush.it uses optimization techniques specific to image format to remove unnecessary bytes from image files. It is a "lossless" tool, which means it optimizes the images without changing their look or visual quality.
Host
  • ImageShack: Host on ImageShack
  • Imgur: Host on imgur.com image hosting
  • OverPic: Host on overpic.het image hosting
  • PostImage: Host on postimage.org
Information
  • Exif viewer: View EXIF information for the image
  • MetaPicZ: Metadata and exif viewer
  • HTTP Viewer: See exactly what an HTTP request returns to your browser
Share
  • AddThis: Share to any of the supported websites by AddThis
  • Facebook: Share on Facebook
  • Twitter: Tweet this image
  • QR Code: Obtain a QR code which point to this image.
Similar
  • Baidu: Reverse image search using the Japanesse Baidu Service
  • Cydral: Reverse image search using Cydral
  • Google: Reverse image search using Google Images
  • TinEye: Reverse image search using TinEye
  • Yandex: Reverse image search using the Russian Yandex Service
Misc
  • Decode QR Code: Lets you decode a 1D or 2D barcode
  • i2OCR: Free online OCR that converts images into editable text.
  • WhatFontIs: Send the image to whatfontis.com to identify the font used.
  • WhatTheFont: Find what the type of font is used on the image
  • WhatsItsColor: Find the complementary and primary color of the image
  • ZoomIt: Converts your image to the Deep Zoom format, which lets you smoothly and efficiently explore the whole image, no matter how large.

PrivaZer: Powerful System Cleaner and History Eraser

Be the first to comment!
Labels:

PrivaZer: Powerful System Cleaner and History Eraser

I have tried more than a handful of system cleaning tools in the past, and all of them are more or less the same. So I didn’t pay much attention when I heard about PrivaZer. But after using the program for a few minutes I was impressed by the program’s deep cleaning abilities. PrivaZer is not just a temporary files cleaner or browser history remover; it’s a privacy cleaner that focuses on removing every bit of trace from your computer irreversibly, by wiping the data multiple times.

PrivaZer can be either installed on the computer or run as a portable application. You can either carry a full system scan or scan selective areas such as Internet activity, old files, software use, registry and USB history. In the full scan, PrivaZer will show you 18 areas where traces of your computer and internet activity can be found.
Some of these areas are common to other file cleaning utilities such as Internet browser history, cookies, registry and Windows history. At first glance, it seems pretty run-of-the-mill. But hold your judgment until you see the details on each of these areas. For instance, if you click on “Internet browsing” you will find a list of five major browsers. Each item in the list is a link that takes you to another section where you can select individual areas in the browser history to remove.
Here is how the Chrome configuration area looks like. Pretty detailed, isn’t it?
privazer-chrome
Other interesting areas include:
History of software use
privazer-windows
Start menu and jumplistsprivazer-jumplist
Software history, traces in pagefile.sys and hibernation.sys file, Indexing traces, download history, traces in MFT, traces in free space, traces in USN journal and more.
After a scan is completed, it provides a detailed report of all traces that has been found.
privazer-results2
There is also an option to view the RAW data from the disk scans.
privazer-results1
As far as cleaning is concerned, PrivaZer doesn’t simply delete the files. It performs military grade file wiping by writing up to six passes of zeroes that makes deleted data practically unrecoverable. And that is for Solid State Drives (SSD). For hard disks, PrivaZer can perform up to 35 passes!
privazer-cleaning
Overall, PrivaZer looks like an excellent product and apparently geared towards the paranoid (35 passes?). Thankfully, the number of passes to perform is your call, so you can choose one or two pass and call it a day.

How to Reverse Tether: Use PC’s Internet Connection on your Android Phone

Be the first to comment!
Labels: ,

tether-androidTethering is the ability to share your mobile phone’s Internet connection with other devices such as laptops via the USB cable. When tethering is done over Wi-Fi, it’s called a wireless hotspot, a term I’m sure you are all familiar with. Since a typical household has more than one Internet capable device, sharing of Internet connectivity is a great way to reduce cost incurred by the ownership of multiple Internet connection. But as it happens, mobile data plans are usually expensive compared to broadband/ADSL plans. So you stand a better chance at saving if the sharing is made the other way round – that is, from the PC to the mobile device. If you have a wireless router at home and your mobile device supports Wi-Fi connectivity you are already set. But if any one of these key components is missing you will be unable to share your PC’s internet connection with your mobile. This is where reverse tethering comes in.

Reverse tethering allows a mobile device to use the Internet connection of the computer it is tethered to via USB. Reverse tethering is useful if the mobile device's own Internet connection is slow due to low signal reception or if the data package is capped and expensive.

Preparation

To reverse tether, you will need a rooted Android phone with SuperUser installed. You will also need a desktop or laptop computer running Windows and a working Internet connection on it.

If this is the first time you are connecting the phone to the computer through USB, you will need to install the USB drivers. Generally, USB drivers are supplied by the device manufacturer together when you buy your phone. If you don’t have the USB drivers, search and download the proper drivers for your phone model.

Instructions

On your Android phone/device enable USB debugging by going to Settings > Applications > Development > USB Debugging.

Connect your phone to your PC using a USB cable.

Download the Reverse Tethering tools (download link 3.34 MB) and extract the contents of the ZIP file to a folder on your computer.

Inside the folder you will find AndroidTool.exe. Run the file and click on the Refresh Devices button. Your Android device should show up as a string of numbers. If there is only one Android device connected you would know. If there are more than one Android devices connected, please disconnect the rest of the devices except the one you want to reverse tether.

android-reverse-tether

Click on the Connect button. This will install the latest android package and the dependencies (busybox and redsocks) on the connected Android phone.

At this point, the SuperUser process may ask you to allow “USB tunnel”. Please do so. If it doesn’t or the Reverse Tethering application fails to connect to the device, open the USB Tunnel app that should be installed on your phone. This should trigger the SuperUser process asking for Superuser rights.

android-reverse-tether2

If the android process crashes after receiving Superuser rights, close the windows program and start again.

Assuming everything went right, you should be connected to the PC’s broadband connection.

What works:

  • Browsing, HTTP downloading, SSL connection and email. Google Chrome might refuse to work.

What doesn’t work:

  • Downloading and installing apps from Google Play/Market doesn’t work, although you can browse the store.
  • ICMP packet (PING) doesn’t work
  • Skype doesn’t work

[via XDA Developers]

Create Firefox Desktop Shortcuts for Specific Profiles

Be the first to comment!
Labels: ,

Firefox stores a user's preferences and data such as installed add-ons, saved passwords, history, bookmarks and others in a unique profile. The first time you start Firefox, it automatically creates a default profile and stores all settings associated with the profile within a special profile folder on your computer. Your profile folder is kept in a separate place from the Firefox program so that if something ever goes wrong with Firefox your information will still be there. It also means you can uninstall Firefox without losing your settings and you don't have to reinstall Firefox to clear your information or troubleshoot a problem.

It’s also possible to have multiple Firefox profiles, each containing a separate set of user information. Different profiles doesn’t necessarily mean different users. The same user can have more than one profile. For instance, you can have a profile for work and another for home. Each profile can have different sets of extensions and bookmarks and customization.

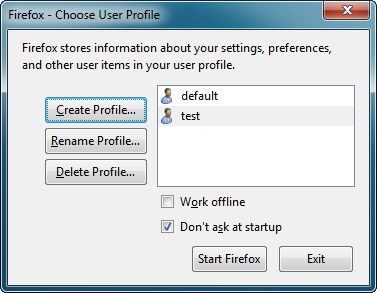
Previously I showed how to create and manage profiles in Firefox using the Profile Manager. Typically, you launch the Profile Manager by using the “–p” switch. That means, you launch Firefox by typing “firefox –p” in the Run dialog box.

firefox-profile-run3

Make sure that Firefox is not running. If it is open, exit it before running this command.

This will launch the Firefox Profile Manager.

firefox-profile-manager

From here you can create new profiles or choose an existing profile to start Firefox with. Now clearly, this involves too many extra steps. So here is a nifty trick.

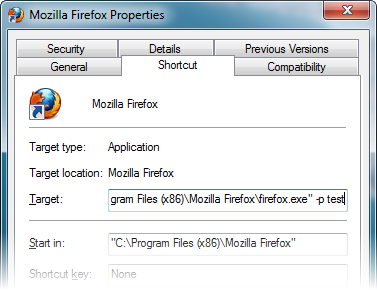
Create a new shortcut of Firefox on your desktop or start menu. Right-click on the shortcut and then click on Properties.

Now on the Target filed, add “-p <profile-name>” at the end of the path. It should look something like this:

"C:\Program Files (x86)\Mozilla Firefox\firefox.exe" -p test

firefox-prop

This shortcut will open Firefox loaded with the profile named “test”. No need to go through the Profile Manager. You can do this for every profile you have created.

If you want to launch a different profile while one Firefox instance is already running, Firefox will just open a new window of the active profile. To fix this issue, add the parameter “-no-remote” to each shortcut’s Target field.

In our example, the Target field becomes:

"C:\Program Files (x86)\Mozilla Firefox\firefox.exe" -p -no-remote test

This trick fixes another annoying issue. When you try to open the private browsing mode, Firefox closes the current session. This is totally undesirable. But with the “-no-remote” parameter in place, you will be able to open Firefox private browsing mode and normal browsing together at the same time.

[via SumTips]

Remove DVD/Blu-ray Copy Protection with Passkey Lite

Be the first to comment!
Labels:

Passkey Lite is a free version of Passkey, which is a Windows-based driver that works on-the-fly to decrypt encrypted movie DVDs and Blu-ray discs. With the help of Passkey Lite you can remove copy protection and region code from DVDs and Blu-rays which can then be accessed by any media player such as VLC Media Player, WinDVD and PowerDVD. It also allows third-party tools like Imgburn and Nero Recode to burn/recode the copy protected DVDs into non-copy protected discs that can be played back in DVD or Blu-ray players.

Once you insert your DVD/Blu-ray into the optical drive, Passkey automatically takes over. It checks if the disc is region locked or copy-protected. If restrictions are found, Passkey will remove it. After a short while, you will get the unprotected disc in your drive, which can play with players like PowerDVD, WinDVD, TotalMedia Theatre, etc. The process usually takes just a minute or two.

Also read: How to Remove Unskippable Anti-Piracy Ads, Region Lock, and Encryption From DVDs

passkey-lite

Sometimes you may be asked to specify the DVD disc's region code to remove RCE limitation. You can also check how many protections and which ones Passkey found and removed in Settings/Info window.

DVD ripping is also provided along with Passkey Lite. Right click on the program’s icon in the notification tray and choose "Rip to Hard Disk" or "Rip to Image", the former saves the content of the disk to the hard drive as a folder, while the latter saves it as an ISO image file.

The DVD protections which can be removed by Passkey Lite are RC (Region Code), CSS (Content Scrambler System), RCE (Region Code Enhancement), APS (Analog Protection System), and UOPs (User Operation Prohibition). For Blu-ray, it can mange AACS V10(Advanced Access Content System), RC, BD-Live, and UOPs. Some copy protections cannot be removed in Passkey Lite such as AACS V12+, BD+, BDAV, and AVCREC for Blu-ray. It doesn't support CPRM for DVD, and PathPlayer is not enabled, so ARccOS, RipGuard, can't be removed. As a result, you can't copy those DVDs, but you are able to freely watch them.

Stoffi: A Music Player That Looks Like Windows Explorer

Be the first to comment!
Labels:

Stoffi Music Player is a new, free and open source music player for Windows that is “aimed at being simple but powerful at the same time”. Stoffi Music Player looks almost like Windows Explorer. The GUI uses the same Explorer scrollbars, buttons, menus and menu highlights. This gives the program a native Windows look that almost makes me believe that it’s a part of the operating system.

The music library view is identical to the Details view mode of Windows Explorer. There are columns that show the artist, album, track title, year, length, genre, last played etc. There is also a Play Count column but it’s not working at the moment.

You can sort your music by clicking on the header of any of the columns. You can also move columns around or hide them.

stoffi

The layout is very fluid and flexible. There is a navigation bar on the left whose width can be resized. A details pane, identical to the details pane of Windows Explorer, is at the bottom which can also be resized to show more or less information. The player is well integrated with Windows 7 taskbar and supports jumplists, playing and pausing music from the taskbar thumbnail.

Stoffi Music Player also supports keyboard shortcuts. An interesting feature here is: if you are used to keyboard shortcuts of a particular music player such as iTunes, Amarok, MusicBee, VLC, Foobar2000 and so on, you can make Stoffi Music Player adopt the same keyboard shortcuts by choosing a player profile.

stoffi2

There are a number of different ways to play music on Stoffi Music Player. One way is to add your folders containing music to the player’s library and then playback your music files from the library. Another way is to create a playlist, drag files from the library and drop it into the playlist, and then playback the playlist. Yet another way to play music is to add files to a “queue”. Queues are temporary playlists - Stoffi Music Player will playback files you drop to the Queue and then remove them as soon as it finishes playing.

A universal search tool lets you simultaneously search for music in your music library, in your playlist, in the queue, in your playback history as well as on YouTube. Results from YouTube can be played back in Stoffi Music Player.

Supported music files include: aac, ac3, aif, aiff, ape, apl, bwf, flac, m1a, m2a, m4a, mov, mp+, mp1, mp2, mp3, mp3pro, mp4, mpa, mpc, mpeg, mpg, mpp, mus, ofr, ofs, ogg, spx, tta, wav, wv

Microsoft Word 2013 Will Support PDF Viewing and Editing

Be the first to comment!
Labels: ,

Microsoft’s upcoming word processing suite Office 2013 is about to get a big upgrade. According to Liveside, Microsoft Word 2013 will be able to open PDF files and even edit them.

Until now, editing PDF documents wasn’t easy or cheap. Free PDF editors are few and far between and their PDF editing abilities are limited. The only true PDF editor in existence today is Adobe Acrobat. It’s still unclear up to what extent Microsoft Word 2013 will allow PDF editing though.

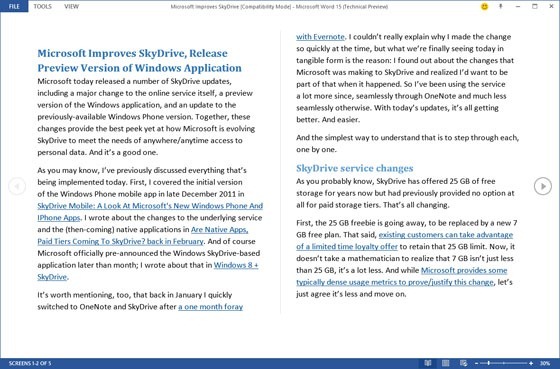
Word-2013-Reading-Mode

Word 2013 reportedly provides a “stunning new reading experience for both traditional Word documents and PDFs that reflows text in a columnar view automatically”. Interesting, the default layout on a traditional landscape PC screen uses a left-to-right scrolling mode, not top-to-bottom as has always been the case with such document-based applications.

Word 2013 will also support bookmarking pages that will allow users to return back to where they left when they closed the document last.

Word-2013-Bookmark

It must be noted that Office 2010 already supports saving documents in the PDF format, but this is the first time the Office application will be able to open and view PDF documents. Office 2013 may sound the death knell for Adobe Reader and many PDF reading utilities such as Foxit Reader. An unexpected outcome of the built-in PDF editing feature will be that the PDF documents will no longer be considered non-tamperable.

The first public beta of Office 2013 is expected to be released sometime next week.


Recent comments

Recent comments

Followers

Sponsors

Recent comments

fefew

Recommend on Google

Copyright © 2011 All Rights Reserved Thesis skin. by Nitin. Converted into Blogger Template by TheTechFizz.